
Bleed, trim box and safe zone are essential for any print-ready file. Without them you risk a white sliver along the edge, trimmed-off text, or a logo falling into the binding gutter.
Bleed, Trim Box and Safe Zone
A printed brochure only looks right if you have set three things correctly in the file: the final size, the trim allowance, and the zone in which you have left nothing important. Without them, you risk a white sliver along the edge, trimmed-off text, or a logo falling into the binding gutter.
Here is how to set them up — and why exactly these values.
What Is the Trim Box?
The Trim Box is the final size of the printed product — the dimensions after cutting. If you are printing an A5 flyer, the Trim Box is 148 × 210 mm. For a business card — 85 × 55 mm. The print shop's RIP reads the Trim Box from the supplied PDF and aligns everything to it.
Important: the document size in InDesign or Illustrator should be the Trim Box, not the size including bleed. Bleed is set up separately (see below). A common mistake is creating a 158 × 220 mm document in an attempt to "include the bleed" — this actually creates a final product larger than planned and confuses the cutting.
What Is Bleed?
A guillotine cannot cut to 0.1 mm precision on every sheet of a run of thousands. There is always a small deviation — typically 0.5–1 mm, occasionally more on long runs, busy presses and folders. If the background or image stops exactly at the edge of the Trim Box, any cutting deviation will reveal a thin white sliver along the edge.
Bleed solves this by extending all background elements beyond the Trim Box. The standard bleed at Spektar is 5 mm on all sides for offset printing. Other print shops use 3 mm — both are within standard, but 5 mm gives more headroom on long runs and on large solid-colour backgrounds, where even a tiny white sliver becomes visible.
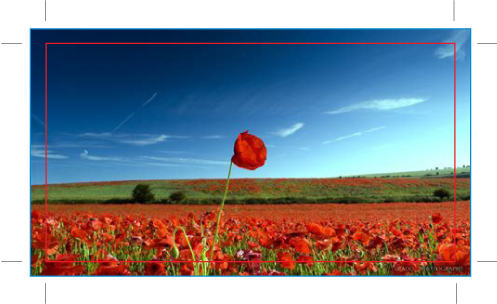
What Goes in the Bleed?
Inside the bleed, the background itself should continue — not new elements. If the background is a solid colour, just extend it. If it's a photo, stretch it 5 mm on each side — or better, carefully clone the edge without distorting the main subject. If it's a gradient, continue it naturally in the direction of the gradient.
Under no circumstances move important elements into the bleed area — they will be cut off if the blade lands exactly at the Trim Box.
What Is the Safe Zone?
The safe zone (Margins in InDesign) is the opposite of bleed — a zone inside the Trim Box, in which all important elements should sit: text, logos, faces in portraits, contact details. Set it to 5 mm in from the edge on all sides.
Anything outside the safe zone risks being trimmed off or landing dangerously close to the edge.
Why exactly 5 mm? Because the blade can also drift the other way — instead of leaving a white sliver, it can cut off part of the Trim Box. If you have text 1 mm from the edge and the blade cuts 1.5 mm inside, the text loses its top or bottom part. The safe zone gives you a buffer in both directions.
How to Set Up Bleed
Adobe InDesign
File → Document Setup → Bleed and Slug → set 5 mm on all sides.
When exporting PDF: Marks and Bleeds → Use Document Bleed Settings and Crop Marks (so we can more easily see the trim line during checking).
Adobe Illustrator
File → Document Setup → Bleed → 5 mm on all sides.
When saving the PDF: General → Adobe PDF Preset → PDF/X-4:2008. This preset includes the right boxes automatically.
Adobe Photoshop
Photoshop has no built-in bleed setting. Create the document larger than the final size:
- Final size A5: 148 × 210 mm
- Size with bleed: 158 × 220 mm (add 5 mm on each side = 10 mm per dimension)
It is convenient to add Guides at the final size so you can visually see where the Trim Box is. Photoshop, however, is less suitable for multi-page products — for brochures, catalogues and books, use InDesign.
PDF/X — The Print Standard
When exporting from any program, the safest choice is PDF/X-4:2008 (or PDF/X-1a:2001 for older RIPs). This standard:
- Includes correctly defined Trim Box and Bleed Box
- Forces all fonts to be embedded
- Requires CMYK or embedded colour profiles
- Excludes interactive elements (scripts, forms, video) which have no place in print
When you submit a "plain" PDF without X-certification, there is always a chance the RIP interprets the boxes differently, fonts are missing, or transparency is lost. PDF/X eliminates these risks and is the universal language between designer and printer.
Safe Zone for Different Binding Types
In binding, part of the safe zone is "eaten" by staples, wire, or the spine. Different binding methods therefore require different inner margins.
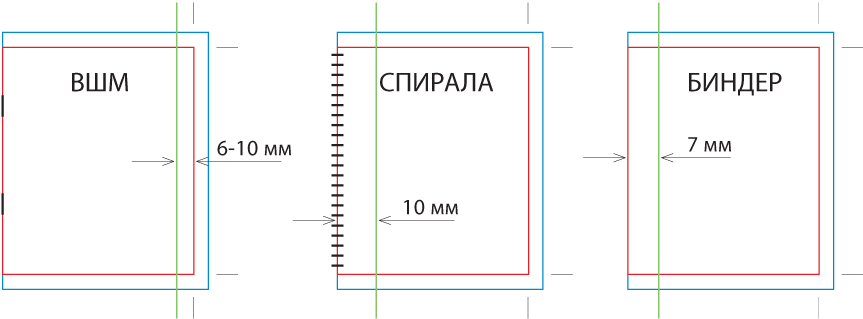
- Saddle-stitch (staples): safe zone in from the trimmed size — 6–10 mm. On thicker brochures the staple sits further from the edge, because the sheets fold around the centre.
- Wire-binding: bleed on all four sides plus a 10 mm safe zone on the wire side. The perforation for the wire "eats" about 8 mm of the width — important elements need to be much further in than usual.
- Perfect binding (hot-glue): on the cover, the spine is part of the spread layout. Inside pages need an extra 7 mm on the spine side so they are not lost after gluing. For books over 200 pages, that margin grows to 10 mm.
- Hardcover (case binding): on the cover itself, text and logo should be at least 15 mm from the edge so they don't fall on the turn-in created when the cover material is wrapped around the boards.
In saddle-stitching, paper thickness causes inner pages to shift outward from the spine — an effect known as creep. At Spektar this is compensated automatically during imposition (Prinect Signa Station): on thin booklets the effect is unnoticeable; on thicker ones, page scaling is applied to keep margins even. The recommended 6–10 mm safe zone above gives buffer in all scenarios.
Common Mistakes
- Document created at exactly the final size, without bleed — imposition simply doesn't accept files without a Bleed box.
- "Empty" bleed — the background ends exactly at the Trim Box — equivalent to no bleed at all, even if you added blank 5 mm on every side
- Text or logo almost at the edge of the Trim Box — looks fine in InDesign at 100%, but the result after print and trim can be disappointing
- Different page sizes within the same brochure — not accepted by prepress!
- Crop marks drawn manually on the page — the RIP prints them as part of the image; always use the Crop Marks option at PDF export, or leave it to us — that way the chance of them landing inside the trimmed format drops to 0
- Photo "stretched" into the bleed by distorting proportions — the top 5 mm of the photo looks squashed; better to clone the edge or use content-aware fill
- Safe zone respected only in text blocks, but not for logos/icons in corners — they often fall too close to the edge, because they are not in the main layout flow
Quick Checklist
- Document size = final size (Trim Box), not size with bleed
- 5 mm bleed on all sides, set in Document Setup
- All backgrounds and images reach the edge of the bleed
- Text, logos and important objects — at least 5 mm inside the trim line
- Export as PDF/X-4 with Bleed and Crop Marks enabled
- Don't create a document with "built-in bleed" in the main size
- Don't draw crop marks manually on the page
- Don't leave important elements in the bleed zone — they risk being cut off during finishing.
- Don't rely on prepress to "fix" missing boxes or missing bleed. Yes, we can do it, but there will always be a delay, and in many cases bleed simply can't be added to certain object types.
Not Sure About a Specific File?
Send it to us before production. In a few minutes we check the Trim Box, Bleed Box and safe zones, and tell you exactly what to correct. Better now than on a finished print run.